RovePlan

Class C Motorhome Pre-Trip & Departure Checklist

Reviewed by RovePlan Editorial TeamUpdated 2026-11-197 min guide27 items in default profile (20 essential)

A 27-item trip preparation and campsite setup checklist engineered specifically for US Class C motorhomes—covering Ford E-450/Chevy chassis checks, onboard generator prep, cab-over bunk gear, and 30A shore power hookups.

Disclosure: As an Amazon Associate, RovePlan earns from qualifying purchases. Read full disclosure.

Filter, Customize & Print Checklist

Trip Profile

Motorhome · Full Hookups (W/E/S) · All Seasons · 2-3 nights · 4 travelers

0 / 27 items packed (0%)20 essential remaining

Print blank for a pen-and-paper clipboard list, or check items below first.

0 of 27 checked

Prints cleanly with pen-ready checkboxes (blank or filled).

Add Custom Trip Item (Saved Locally)

20 essential remaining

0/27 packed

Packing & Pre-Trip Field Notes

Chassis Readiness vs. House Systems on a Class C Coach

Unlike towable trailers, a Class C motorhome merges an automotive commercial cutaway chassis (typically Ford E-350/E-450, Transit, or Chevrolet Express 4500) with a residential 120V/12V house cabin. Pre-trip prep therefore requires two parallel workflows: verifying engine oil, brake fluid, coolant, and dual rear wheel cold PSI on the chassis side, and exercising the onboard generator, house battery bank, propane furnace, and water pump on the cabin side before leaving your driveway.
Weight Distribution, Overhead Clearance & Campground Pedestal Safety

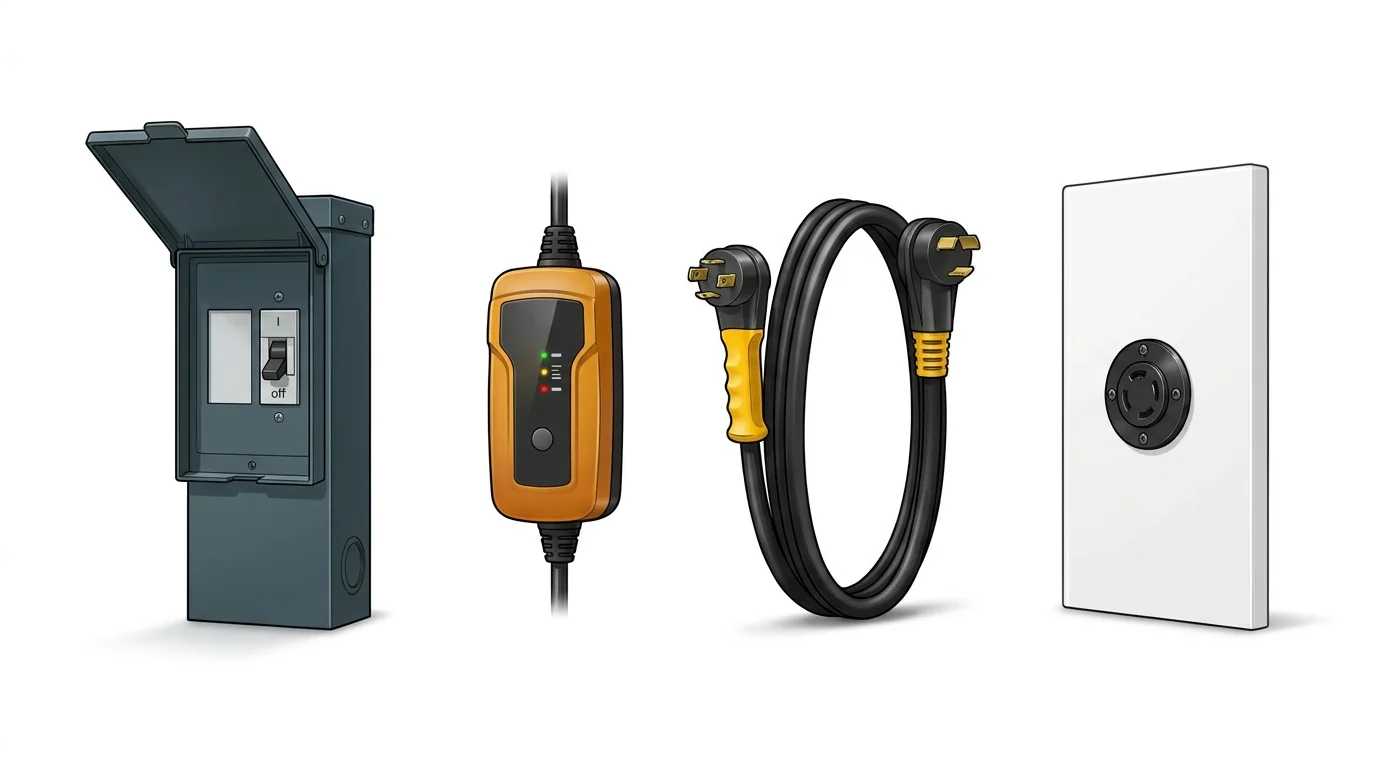
Because Class C motorhomes place significant loft volume in the cab-over bunk and large rear basement pass-through compartments, heavy gear such as water jugs, toolboxes, and leveling blocks should be stowed low and forward of the rear axle whenever possible to stay within rear GAWR limits. At the campsite, always post a height clearance card on the sun visor, turn the pedestal breaker OFF before plugging in your 30A EMS surge protector, and verify generator exhaust clears all open windows.

Visual Setup & Hookup Sequence Reference

Technical illustrations of standard US campground hookup order and leveling safety geometry (always confirm ratings in your RV owner's manual).

A. Safe Shore Power & Fresh Water Hookup Sequence

Protect coach electronics & PEX plumbing

ELECTRICAL (30A TT-30P / 50A 14-50P) — TURN BREAKER OFF BEFORE PLUGGING

Illustration: Four-step US RV shore power hookup sequence from left to right: campground power pedestal with breaker off, inline EMS surge protector, heavy-duty 30A/50A shore cord, and RV twist-lock shore power inlet
  1. 1. Pedestal

    Breaker OFF first

  2. 2. EMS Surge Guard

    Verify polarity & voltage

  3. 3. RV Shore Cord

    Lock twist-ring inlet

  4. 4. Breaker

    Switch ON

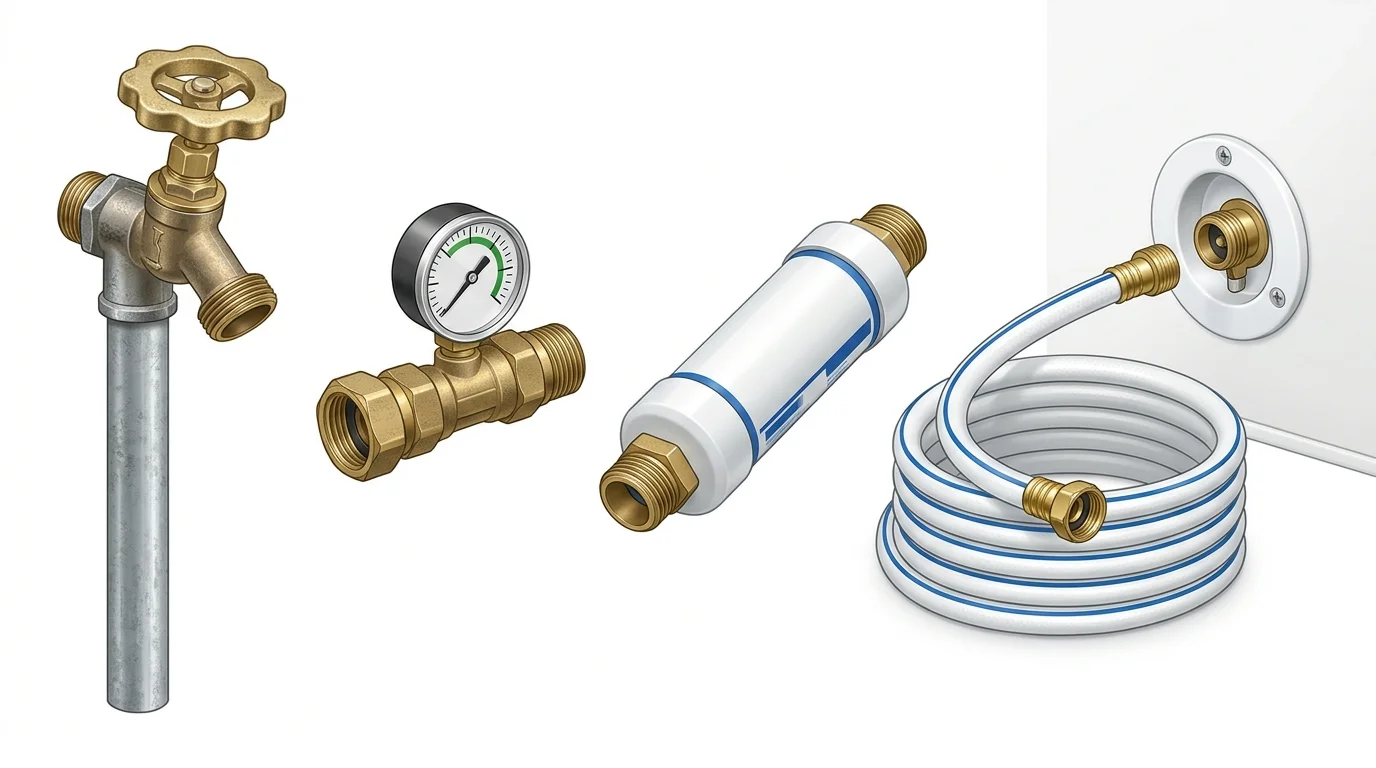
POTABLE WATER (NSF/ANSI 61) — FLUSH SPIGOT BEFORE ATTACHING HOSE

Illustration: Four-step US RV fresh water hookup sequence from left to right: campground water spigot, brass 40 to 50 PSI pressure regulator with gauge, inline potable filter cartridge, and drinking water hose to RV city water inlet
  1. 1. Camp Spigot

    Flush 10 seconds

  2. 2. Pressure Regulator

    Clamp to 40–50 PSI

  3. 3. Inline Filter

    Follow arrow direction

  4. 4. Potable Hose

    To RV City Inlet

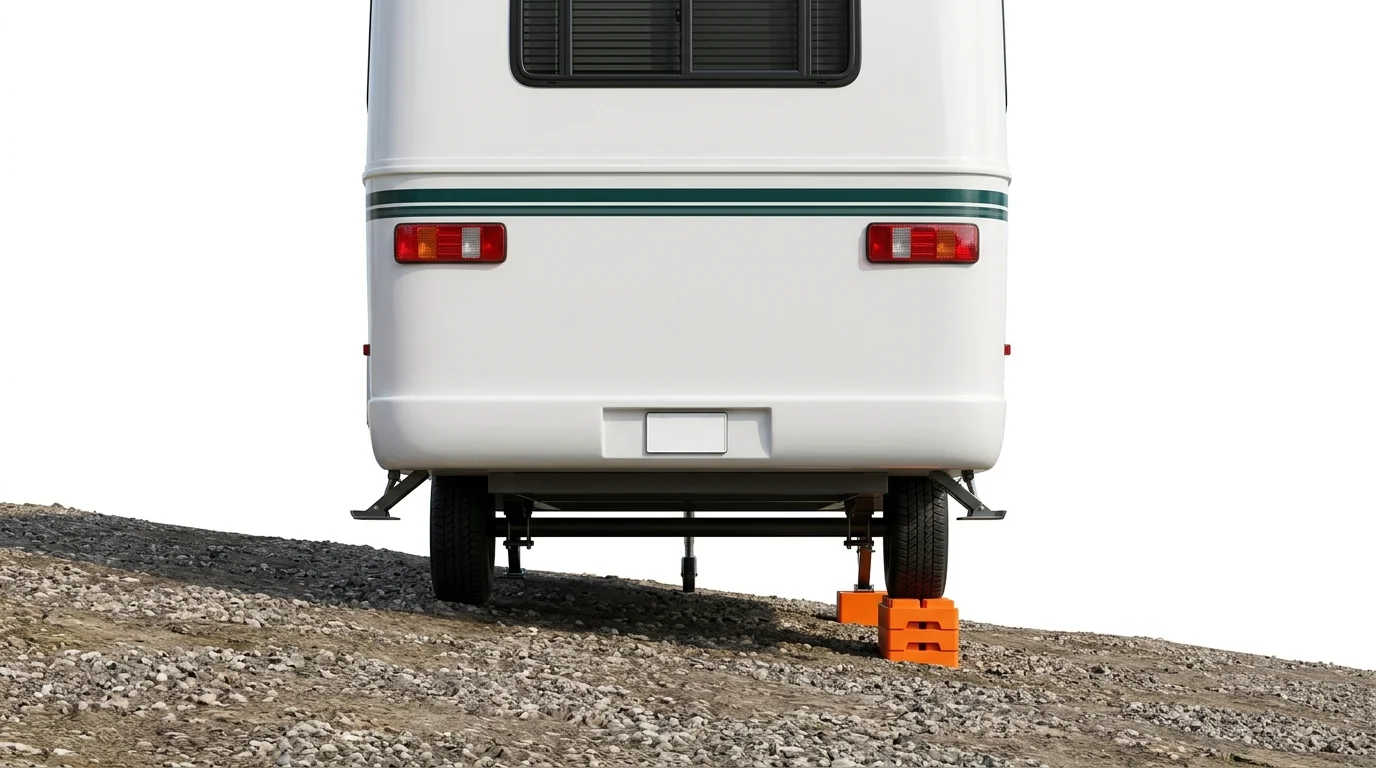
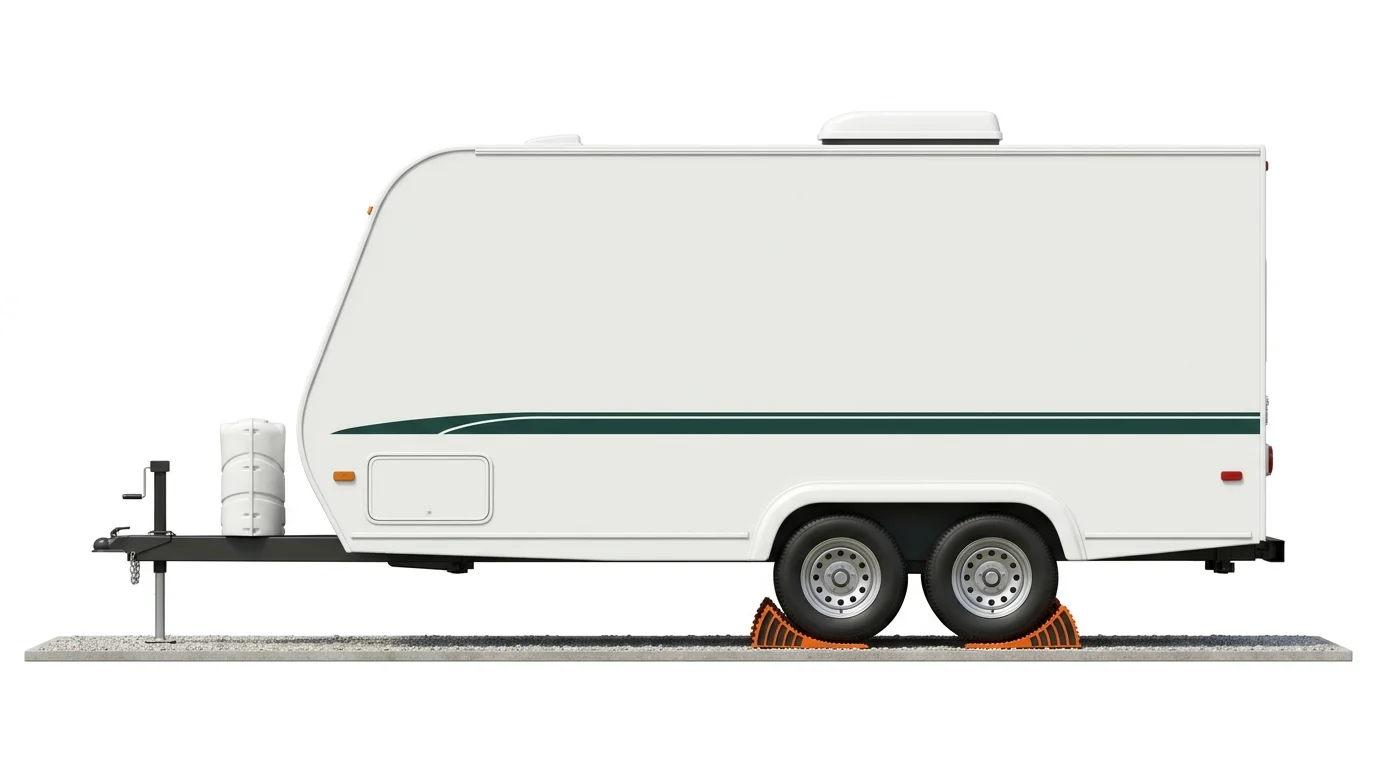
B. Campsite Leveling Blocks & Wheel Chocking Geometry

Chock wheels BEFORE unhitching

STEP 1: LEVEL SIDE-TO-SIDE FIRST

Axle Bubble Level
0° Level
Illustration: Rear view of travel trailer resting level on sloped campsite ground with interlocking orange polymer leveling blocks stacked neatly under the low-side tire

Blocks under low-side tire

STEP 2: CHOCK TIRES BEFORE UNHITCHING

Jack AFTERUnhitch & level front-to-back second
Illustration: Side view of tandem-axle travel trailer with heavy-duty orange wheel chocks wedged tightly in front of and behind the tires before raising the front tongue jack

Chocks wedged tight front & rear

Why We Specify These Hardware Ratings

  • EMS vs. Basic Surge Strips: Full Electrical Management System (EMS) units cut power during open neutrals, reverse polarity, or sustained low-voltage brownouts—basic surge strips only absorb brief spikes.
  • 40–50 PSI Lead-Free Brass Regulators: Unregulated US park spigots can exceed 80–100 PSI; capping pressure protects interior PEX crimps and water heater check valves.
  • NSF/ANSI 61 Potable Hoses: Residential green garden hoses are not certified food-grade and can leach plasticizers into coach lines.
  • 15A Household Adapters: Limited strictly to ~1,500W for battery charging and lights—never power roof A/C compressors or electric water heaters through a 15A outlet.

US Safety Standards & Reference Sources

Always verify exact specs in your coach and tow-vehicle owner's manuals.

Field Guide: Key Specs, Pitfalls & Timing

Class C Quick Reference

Key Numbers & Rules of Thumb

  • Height clearance: most Class C cabover coaches measure 10 ft 8 in to 11 ft 6 in tall including the roof A/C—know your exact height placard for low bridges and fuel canopies.
  • Tail swing warning: rear overhang behind the dually axle swings outward up to 3–4 feet during sharp turns; watch gas pumps and concrete bollards.
  • Generator fuel cutoff: onboard Onan gas generators automatically shut down when chassis fuel drops near 1/4 tank so you never strand the engine.
  • Dual-wheel PSI check: inspect inner rear dually valve stems with a dual-head tire gauge and valve extensions before every highway leg.

Common Rookie Mistakes to Avoid

  • Overloading the rear garage/pass-through beyond Rear Gross Axle Weight Rating (GAWR), unloading the front steering axle and causing highway wander.
  • Forgetting to stow heavy bedding or laptops out of the cabover bunk safety net before braking.
  • Turning on the roof A/C while plugged into 15A household power or running both microwave and A/C simultaneously on a single 30A circuit.
  • Pulling out with the automatic entry step locked out or the awning support arm unlatched.

Pre-Trip Timing & Prep

  • 7 days out: exercise the onboard generator under 50% load for 30 minutes and inspect engine oil, transmission fluid, coolant, and rear dually tire tread.
  • 24 hours out: set leveling pads and wheel chocks in an easy-reach exterior bay, verify 30A EMS surge unit and shore cord latch, and latch all interior drawers.
  • Every fuel/rest stop: do a fast 60-second walkaround checking dually tire temperatures by hand, bay doors, and tow-dolly/flat-tow bar pins if pulling a toad.

Frequently Asked Questions

Do Class C motorhomes use 30-amp or 50-amp campground shore power?
Most single-AC Class C motorhomes under 30 feet use a 30-amp (TT-30P) shore power cord, while larger Class C coaches with dual roof air conditioners often require 50-amp (NEMA 14-50P) service. Always match your EMS surge protector and dogbone adapters to the cord rating listed in your coach manual.
Why do Class C motorhomes need wider leveling blocks?
Most Class C motorhomes built on Ford E-450 or Chevy 4500 chassis have dual rear wheels (dually). Standard narrow blocks can pinch or crack between dual tires unless both rear tires on the low side sit evenly on wide interlocking blocks or thick lumber planks.
How often should I exercise my Class C onboard generator before a trip?
Most generator manufacturers (such as Onan/Cummins) recommend running the generator under at least a 50% electrical load (such as the roof air conditioner) for 30 to 60 minutes every month to keep carburetor jets clear and lubricate internal seals.
Can passengers ride in the cab-over bunk while driving a Class C motorhome?
No. Cab-over bunks do not have DOT-certified seatbelts or crash protection. All passengers must remain seated with buckled seatbelts in forward- or rear-facing coach seats rated for travel in your motorhome manual.
Do I need a special GPS for a Class C motorhome?
Yes. Standard car navigation apps can route a 11.5-foot-tall Class C onto parkways with low stone overpasses or steep restricted grades. An RV-specific GPS or routing app lets you enter your exact height, length, and GVWR.
View all 15 checklists →